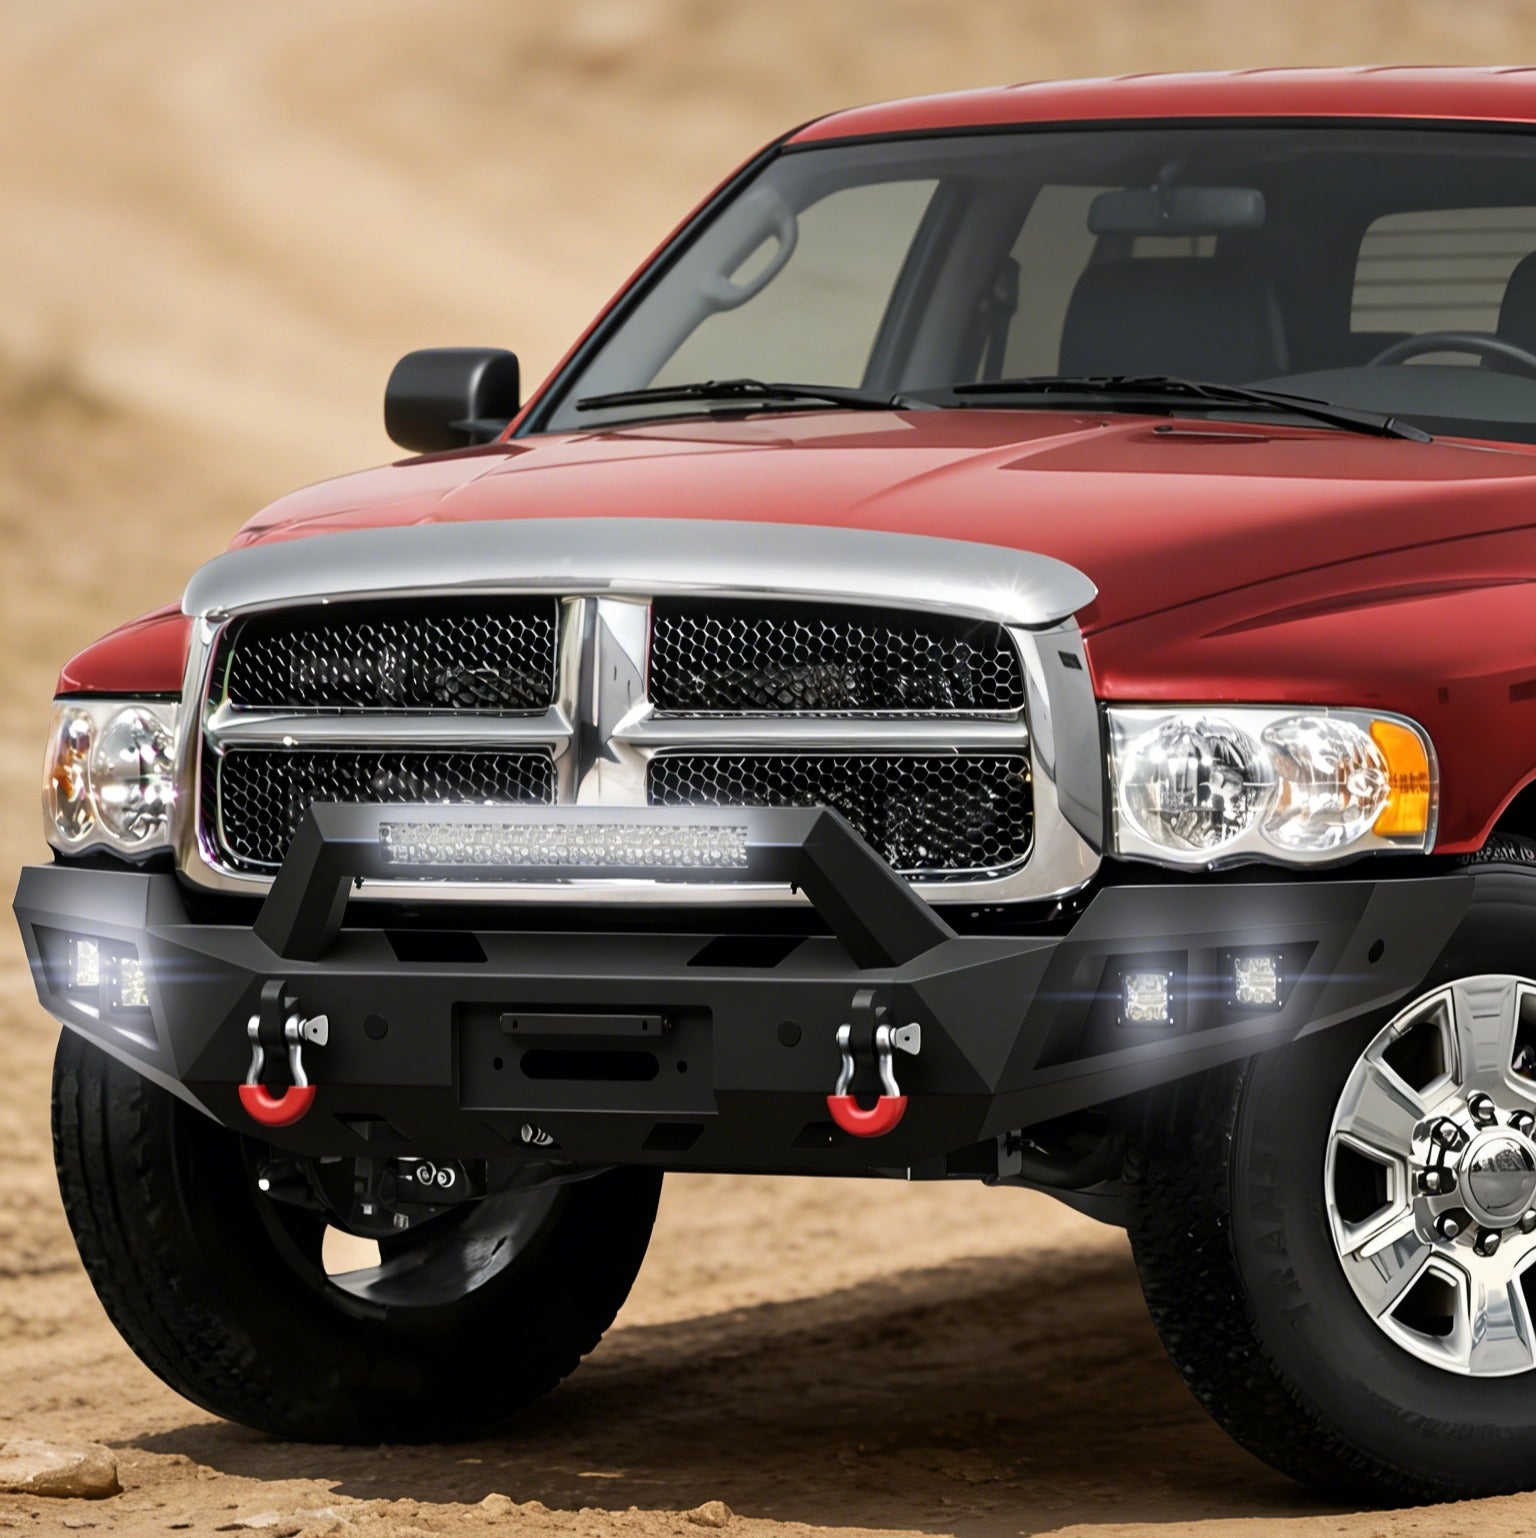
2019 Ram 2500 Front Bumper Replacement: 4-Year Owner Review & Install Guide
Is an Aftermarket Ram 2500 Front Bumper Really Worth It?
If you own a 2019 Ram 2500, you've probably asked yourself the same question I did:
"Is replacing the factory front bumper actually worth the money, or is it just for looks?"
After owning my truck for more than four years, towing trailers, driving gravel roads, visiting construction sites, and taking weekend camping trips, I finally decided to replace the factory bumper with a heavy-duty steel aftermarket bumper.
After several weeks of driving with it, my answer is simple:
Yes—but only if you choose a bumper that's engineered correctly and installed properly.
The factory bumper on the Ram 2500 does a decent job for daily driving, but it has limitations. It offers limited front-end protection, no integrated recovery points, and little room for auxiliary lighting. Once I started using my truck the way a heavy-duty pickup is meant to be used, those limitations became obvious.
This guide isn't written by someone who simply copied an installation manual. It's written from the perspective of a Ram owner who wanted better protection, improved functionality, and a tougher appearance without sacrificing factory fitment.
Whether you're shopping for a 2019 Ram 2500 front bumper, replacing a damaged 2020 Ram 2500 front bumper, or planning upgrades for a 2025 Ram 2500 front bumper, this article walks through everything I learned during the installation process and what I'd do differently if I had to install another one tomorrow.

Why I Finally Replaced My OEM Ram 2500 Bumper
When I first bought my truck, I had no plans to replace the bumper.
The OEM bumper looked good, fit perfectly, and matched the truck's design.
However, after years of ownership, I noticed several shortcomings.
1. Limited Front-End Protection
The factory bumper is designed for normal street driving. It isn't intended to handle impacts from rocks, brush, or rough job-site conditions.
Every time I drove narrow forest roads, I found myself worrying about damaging the lower plastic sections.
2. No Integrated Recovery Points
I occasionally travel on muddy trails and snow-covered roads.
The OEM setup relies on factory tow hooks, but I wanted a bumper with integrated D-ring mounts that are easier to access during recovery situations.
3. Better Lighting for Night Driving
Driving rural highways at night made me realize how much additional lighting could improve visibility.
This bumper includes:
22-inch integrated LED light bar
Dual LED cube lightswhich provide much better forward illumination than the factory setup.
4. A More Functional Design
For me, this wasn't just about appearance.
I wanted:
- Better approach angle
- Stronger steel construction
- Better protection for the radiator area
- Skid plate protection
- A bumper designed for real truck use. The aggressive styling was simply a bonus.
Before Ordering an Aftermarket Ram 2500 Front Bumper
One thing I learned is that not every aftermarket bumper fits every owner's needs.
Before ordering, I made a checklist.
My Pre-Purchase Checklist
- ✔ Compatible with 2019–2025 Ram 2500
- ✔ Bolt-on installation
- ✔ Reuses factory mounting locations
- ✔ Includes LED lighting
- ✔ Includes recovery points
- ✔ Includes skid plate
- ✔ Powder-coated steel construction
- ✔ No frame cutting required
Checking these items before buying can save a lot of frustration later.
Tools Required
One thing I appreciated about this installation is that it doesn't require specialty tools.
Here's everything I actually used.
| Tool | Purpose |
|---|---|
| 15/16" Socket | Remove factory tow hook bolts |
| 18mm Socket | Remove factory bumper bolts |
| Ratchet | General removal |
| Torque Wrench | Final tightening |
| Trim Removal Tool | Plastic retainers |
| Floor Jack (Optional) | Support bumper weight |
| Safety Gloves | Protect hands |
| Safety Glasses | Eye protection |
Estimated Installation Time
| Experience Level | Time |
|---|---|
| Professional Shop | 1.5–2 Hours |
| Experienced DIY | 2–3 Hours |
| First-Time DIY | 3–4 Hours |
Difficulty: ⭐⭐⭐☆☆ (3/5)
A helper is highly recommended because the assembled steel bumper is significantly heavier than the factory bumper.
What's Included in the Package?
Before starting the installation, I unpacked everything and confirmed every component was included.
The package contains:
- Main bumper body
- Left wing
- Right wing
- Steel skid plate
- Mounting brackets
- License plate bracket
- Two D-rings
- 22-inch LED light bar
- Dual LED pod lights
Complete installation hardware (M8, M10, and M12 fasteners). I highly recommend laying every component on the floor before beginning assembly. It makes identifying parts much easier.

Step-by-Step Installation Guide
Download the Installation Manual Before You Begin
Before starting the installation, I recommend downloading the electronic version of the installation manual and keeping it available on your phone, tablet, or laptop.
The manual includes a complete parts overview, hardware reference, bumper assembly sequence, factory bumper removal points, mounting locations, and skid plate installation diagrams. Reviewing it before you begin makes it much easier to organize the included hardware and understand the full installation process.
For the smoothest installation, download the manual in advance and review each step before removing the factory bumper.
📄 Download Installation Manual (PDF)
2019–2025 Ram 2500 Front Bumper Installation Manual · Free PDF Download
Step 1 — Assemble the Bumper Before Touching the Truck
This is one recommendation I completely agree with.
Rather than trying to assemble parts while they're attached to the truck, assemble the bumper on the garage floor first.
Install:
- Left wing
- Right wing
- Center section
- LED light bar
- Mounting brackets
using the supplied hardware.
One important lesson I learned:
Do NOT fully tighten the hardware yet. Leave everything finger-tight.
This allows you to make small adjustments later when aligning the bumper with the truck.
That small decision saved me almost half an hour during final installation.
Step 2 — Disconnect the Factory Wiring
Before removing anything else, crawl underneath the driver's side and disconnect the factory bumper wiring harness.
This prevents accidentally pulling on the wiring when removing the OEM bumper.
Although this only takes a minute, skipping it could easily damage connectors.
Step 3 — Remove the Factory Tow Hooks
Using a 15/16-inch socket, remove both factory tow hooks.
The installation manual recommends saving these factory fasteners for reuse, which I also suggest doing.
My Experience
The driver's side bolts came out without much effort.
The passenger side had several years of dirt and road grime built up.
A little penetrating oil made removal much easier.
If your truck has seen winters with road salt, expect this step to take longer.
Step 4 — Remove the OEM Front Bumper
Using an 18mm socket, remove the factory bumper mounting bolts from both sides.
Once the bolts are removed, carefully pull the bumper forward and away from the frame.
I strongly recommend having another person help here.
The factory bumper isn't extremely heavy, but handling it alone while protecting the paint can be awkward.
Step 5 — Remove Factory Plastic Mounts
With the bumper removed, you'll notice several plastic retainers and mounting brackets attached to the front of the truck.
These need to come off before installing the new bumper. Keep every reusable bolt organized in separate containers.
Trust me—you won't remember which bolt came from where two hours later.
Step 6 — Lift the New Bumper into Position
Once the factory bumper was removed and the frame rails were exposed, it was finally time to install the new bumper.
This was the only part of the installation where I absolutely recommend having a second person.
Although the bumper is designed as a direct bolt-on replacement, the assembled steel bumper is much heavier than the OEM bumper. Trying to support it with one hand while starting the mounting bolts with the other is possible—but not enjoyable.
We carefully lifted the bumper into place and loosely installed the supplied M12 mounting hardware before making any adjustments. As shown in the installation instructions, the bumper mounts directly to the factory frame locations using the included brackets and hardware.
Owner's Tip (Save Yourself 30 Minutes)
Do not tighten any mounting bolts until every gap looks even.
We initially tightened the driver's side first because it looked perfect. After stepping back, we realized the passenger side sat slightly lower than the fender. We had to loosen every bolt and start again.
Leaving all hardware finger-tight until the very end made alignment much easier and produced factory-like panel gaps.
Step 7 — Check Alignment Carefully
This step took longer than I expected—but it's also the difference between an average installation and one that looks factory-installed.
Before tightening anything, I checked:
- Gap between bumper and grille
- Gap between bumper and both fenders
- Hood clearance
- Symmetry from left to right
- Skid plate alignment
Instead of checking from one angle, I walked around the truck several times and even backed up about 15 feet to look at the front end. Small alignment differences are much easier to notice from a distance.
Only after everything looked centered did I torque the mounting hardware.
Step 8 — Install the Steel Skid Plate
With the bumper aligned, installing the skid plate was straightforward.
The skid plate bolts directly beneath the bumper using the supplied M8 hardware and helps protect the lower radiator area from rocks, debris, and unexpected obstacles.
Besides the added protection, it also gives the entire front end a much cleaner finished appearance.
Step 9 — Connect the LED Lights
The bumper includes: One integrated 22-inch LED light bar and two LED cube lights.
The installation guide recommends completing the wiring only if you're comfortable working with automotive electrical systems. Otherwise, having a professional complete the wiring is a good idea.
Before reinstalling any trim pieces, I tested every light to make sure all connections worked correctly.
Trust me—finding a loose connector before everything is fully assembled is much easier than taking the bumper apart again.
Real Installation Timeline
One question I couldn't find online before starting was "How long does this actually take?"
Here's my real timeline.
| Installation Stage | Approximate Time |
|---|---|
| Unboxing & Hardware Check | 20 minutes |
| Assemble Bumper | 40 minutes |
| Remove OEM Bumper | 45 minutes |
| Install New Bumper | 45 minutes |
| Alignment & Adjustments | 25 minutes |
| LED Wiring & Testing | 20 minutes |
| Total DIY Time | About 3 hours |
Total DIY Time: About 3 hours
If you've installed aftermarket bumpers before, you could probably finish in around two hours.

My Real Installation Experience
This section is probably what I wish I'd found before buying the bumper.
Many installation guides explain how to install a bumper.
Very few explain what the experience is actually like.
First Impression
The first thing I noticed after stepping back wasn't the aggressive styling—it was how much more proportional the truck looked.
The larger steel bumper balanced the front end much better, especially with larger all-terrain tires.
The truck looked like it was built for work rather than just commuting.
Driving Experience
After driving several hundred miles—including on highways, gravel roads, and during one camping trip—I noticed several improvements.
Better Confidence
I no longer worried about scraping the lower plastic valance when entering steep driveways or uneven trails.
That peace of mind alone made the upgrade worthwhile.
No Unexpected Noise
One concern I had was vibration.
Fortunately, there were:
- No rattles
- No squeaks
- No noticeable movement
- No unusual wind noise
Everything remained solid after installation.
LED Performance
The integrated LED light bar made a noticeable difference on dark rural roads. I wouldn't replace my headlights with it, but it dramatically improved visibility beyond the factory high beams.
OEM vs Aftermarket Ram 2500 Front Bumper: Full Comparison
One of the biggest questions owners ask is whether an aftermarket bumper offers more than just a different appearance.
Here's my comparison after using both.
| Category | OEM Bumper | Aftermarket Ram 2500 Front Bumper |
|---|---|---|
| Front-End Protection | ★★☆☆☆ | ★★★★★ |
| Recovery Capability | Factory Tow Hooks | Integrated D-Ring Mounts |
| Auxiliary Lighting | None | 22" LED + Dual Pod Lights |
| Skid Plate Protection | No | Included |
| Off-Road Confidence | Moderate | Excellent |
| Appearance | Factory Style | Heavy-Duty Off-Road Look |
| Customization | Limited | High |
Comparison Conclusion
If your truck spends nearly all of its time on paved roads, the OEM bumper is perfectly adequate.
After comparing the factory bumper with this aftermarket setup, I found that choosing a vehicle-specific design made the biggest difference. If you're considering the same upgrade, you can check out the POFENZE Aftermarket Ram 2500 Front Bumper to see all the included features, installation details, and compatibility for 2019–2025 Ram 2500 models.
👉 View Product Details & Compatibility → POFENZE 2019–2025 Ram 2500 Front Bumper
Why I Chose the POFENZE Ram 2500 Front Bumper
Before buying, I compared several aftermarket bumpers from different brands. My goal wasn't just to find the lowest price—I wanted a bumper that combined solid construction, straightforward installation, and features I'd actually use.
After comparing several options, I chose the POFENZE Ram 2500 Front Bumper for a few practical reasons.
Built Specifically for 2019–2025 Ram 2500
One of my biggest concerns was fitment. Some aftermarket bumpers require modifications or additional fabrication, which can quickly turn a weekend project into a frustrating experience.
The POFENZE bumper is engineered specifically for 2019–2025 Ram 2500 models and is designed to mount using the factory frame locations, making installation much more straightforward.
Featured Product
Designed specifically for 2019–2025 Ram 2500 trucks, this heavy-duty steel bumper combines factory-style fitment with practical off-road functionality. It includes a 22-inch LED light bar, dual LED pod lights, integrated D-ring mounts, a steel skid plate, and complete installation hardware for a straightforward bolt-on installation.
Perfect for:
- Daily drivers who want better front-end protection
- Towing and work trucks
- Off-road and overlanding enthusiasts
- Owners replacing a damaged OEM bumper
- Anyone looking for a durable aftermarket Ram 2500 front bumper
👉 View Product Details & Compatibility → POFENZE 2019–2025 Ram 2500 Front Bumper
Who Should Buy This Bumper?
I don't think every Ram owner needs an aftermarket bumper.
Here's my honest opinion.
This bumper is a great choice if you:
- Frequently tow trailers
- Drive gravel or forest roads
- Want integrated recovery points
- Need additional off-road lighting
- Prefer better front-end protection
- Like a more aggressive appearance
You may not need it if you:
- Only drive in the city
- Never tow or go off-road
- Prefer keeping the truck as light as possible
- Rarely drive at night
Common Installation Mistakes to Avoid
If I were installing another bumper tomorrow, these are the mistakes I'd avoid.
| Mistake | Why It's a Problem | Better Approach |
|---|---|---|
| Tightening one side first | Uneven panel gaps | Leave all hardware loose until final alignment |
| Installing alone | Difficult to support bumper safely | Have a second person help |
| Forgetting to test the LEDs | Requires disassembly later | Test wiring before final tightening |
| Mixing OEM hardware | Slows installation | Organize bolts before starting |
| Skipping final inspection | Missed alignment issues | Walk around the truck before torqueing everything |
Tips From My Real Installation
These small details made a much bigger difference than I expected.
- Lay every bolt and bracket out before starting.
- Take photos of the factory setup before removal.
- Use painter's tape around the fenders if you're worried about scratching the paint.
- Don't rush alignment—it determines how professional the finished installation looks.
- Recheck every mounting bolt after the first 100–200 miles of driving.
Frequently Asked Questions
Will this bumper fit a 2019 Ram 2500?
Yes. It's designed specifically for 2019–2025 Ram 2500 models.
Does it also fit a 2020 Ram 2500?
Yes. If you're looking for a 2020 Ram 2500 front bumper, this same design is compatible.
Will it fit the 2025 Ram 2500?
Yes. It also fits the 2025 Ram 2500 front bumper application.
Do I need to drill my frame?
No. The bumper uses the factory mounting locations and is designed as a direct bolt-on replacement.
Can I install it by myself?
Technically yes. Realistically, having another person makes the installation much easier and much safer because of the bumper's weight.
Does it include LED lights?
Yes. The package includes: One 22-inch LED light bar; Two LED pod lights.
Will I lose my factory tow hooks?
The factory tow hooks are removed during installation as part of the replacement process. The aftermarket bumper instead provides integrated heavy-duty D-ring recovery points, giving you a dedicated recovery solution. (Always verify compatibility with your specific vehicle configuration before installation.)
Final Verdict
After completing the installation and spending time driving with the bumper, I can honestly say this upgrade delivered far more than I originally expected.
Of course, it completely transformed the appearance of my truck—but that wasn't the biggest benefit.
The biggest improvement was confidence.
Whether I was driving through construction sites, navigating rough campground entrances, or simply parking without worrying about scraping the lower front fascia, the truck felt better prepared for the way I actually use it.
For anyone shopping for a 2019 Ram 2500 front bumper, replacing a damaged 2020 Ram 2500 front bumper, or upgrading to a 2025 Ram 2500 front bumper, a well-designed aftermarket Ram 2500 front bumper is one of the few modifications that improves both functionality and appearance at the same time.
If you're looking for a front bumper that combines heavy-duty steel construction, integrated LED lighting, recovery-ready D-ring mounts, skid plate protection, and a true bolt-on installation, this upgrade is well worth considering.